
Introduction
One day you decided to add another async request to your home page, nothing complex. After a short period of time, everything is done and you’re happy, but then the previously stable home page starts lagging, animations look glitchy, and you don’t even know what is going on. The first question that comes to your mind is “Why would it lag? I’ve added async properly!” But what if the simple Future method is not the right solution? That’s exactly what I want to discuss.
Today I would like to show a simple but at the same time useful example of how you can avoid hurting your app’s performance with Future requests by integrating Isolates into your code base.
In this post you will find:
1. How to identify the UI freeze caused by heavy computation
2. When you should use isolates to reduce those freezes
3. Review the practical implementation
Identifying the UI freeze
As we know Flutter is single threaded. Therefore we should be particularly careful with heavy calculations on the mobile side to make sure that we are not blocking the main thread.
If your app is targeting 60 FPS then by simply dividing one second by target FPS we get the following mathematical expression 1/60 = 0.0166 or in other words 16.67 milliseconds.
As a result, we have that a 300ms async operation will cause ~18 missed frames! If you go over 1 second, that’s a completely frozen UI and 60 missed frames.

What is Isolate?
Before moving to the code, we need to get some overall understanding of what an isolate is. Imagine you’re drawing a painting and trying to solve a math expression at the same time, on the same piece of paper using one hand. Logically, you will be able to perform only one task at the time while the other task will be blocked. But what if you have a brother? You give him a pen, a copy of your paper and a small note that allows you to be able to communicate with each other. That’s how Flutter works!
Structure:
- You – main isolate
- Your brother – additional isolate
- Your paper – main program memory
- Your brother’s paper – separate memory
- The note – a way to send messages between isolates
Limitations of Isolates
If isolates are so great, why doesn’t everyone use them instead of creating another Future request? To answer this question let’s take a look at the cons of using isolates.
- Troublesome debugging process
With all the benefits that isolates bring to the table, they also introduce significant complexity, especially when it comes to the debugging process. Isolate requires errors to be handled explicitly, it makes interpreting the stack trace much harder and elevates the difficulty of debugging to the next level compared to the standard sync code.
- Data Transfer complexity
Isolates have their own memory space that is not shared with other isolates. If you need to perform calculations based on the data from the main isolate you will need to establish communication ports. Passing data is okay until you need to continuously stream new data to the isolate. In complex structures communication can quickly become tricky and open to the new bugs.
- Costly process of Isolate creation
When dart creates a new isolate there are few things that should be done before it can be used. Only after initializing a new thread, allocation separated heap and establishing communication ports utilization of the specific Isolate will be allowed. This process leads to a simple conclusion: It’s more efficient to use the Future method for short requests instead of creating a new isolate for a one-time usage.

How to create Isolate in Flutter
- Flutter provides a lot of tools for creating and managing isolates. The basic flow will look like this
a) Isolate.spawn() in order to create a new Isolate
b) ReceivePort and SendPort will help us establish proper communication between newly created and main isolates
c) Isolate.exit() is used as the final step in our flow
- Sometimes making all those steps is a bit of overkill therefor in Flutter we have a function that simplifies a way to use an isolate in our code and it’s called compute()
a) Spawns (starts and creates) an isolate.
b) Runs a function on the spawned isolate.
c) Captures the result.
d) Returns the result to the main isolate.
e) Terminates the isolate once work is complete.
f) Checks, captures, and throws exceptions and errors back to the main isolate.
In-app Example
How to utilize compute()?
Imagine you’re working on a successful mobile app with millions of active users. As always you’re trying to make everything smooth and responsive, and you decide to perform backend sync. As a result you get three large JSON files each containing 10,000 users. Those files are stored locally but they still need to be parsed inside the app so that you could use them in the UI.
Now we have the following situation: A user opens the app, initial data processing starts immediately. If you run JSON decoding by simply calling a Future request UI freezes, animations start lagging and everything will crumble in an instant.
Let’s take a look at the Future request that could lead us to the terrific results:
1 Future<int> parseAllJsonFiles(List<String> jsonStrings) async {
2   int totalUsers = 0;
3   for (final jsonString in jsonStrings) {
4     final data = json.decode(jsonString);
5     final users = data['users'] as List;
6     totalUsers += users.length;
7   }
8   return totalUsers;
9  }
10
11 final userCount = await parseAllJsonFiles([json1, json2, json3]);
At the first glance everything looks great, but let’s check the result in the app

As we can see at first glance, a simple action can cause real trouble for the user experience. The operation that took 836ms caused us to lose 50 frames. We can’t allow our app to lag like this. Let’s get some work done and fix this mess.
A great idea in such situations to use Isolates for handling those calculations, we can start new Isolate manually by utilizing Isolate.spawn() but this would be the right fit for complex sequence of actions but in our example we have one single request that can be handled with the compute() function.
Computing is a simple way to quickly create new isolates and handle heavy computations.
Let’s take a look at the fixed version of the code:
1 Future<int> parseAllJsonFiles(List<String> jsonStrings) async {
2   int totalUsers = 0;
3   for (final jsonString in jsonStrings) {
4     final data = json.decode(jsonString);
5     final users = data['users'] as List;
6     totalUsers += users.length;
7   }
8   return totalUsers;
9  }
10
11 final userCount = await parseAllJsonFiles([json1, json2, json3]);
As you can see, compute() is simple and straightforward to use. But the main question is what difference has it made in the app. Let’s see

How to utilize Isolate.spawn()?
As we have seen, compute() is a go-to solution to handle heavy work on background isolate. Its main benefit is how simple and straightforward it is to use. But what if you need to perform multiple calculations using data from the main isolate.
Naive approach would look like this:
1 for (final batch in batches) {
2   final result = await compute (parseBatch, batch);
3 }
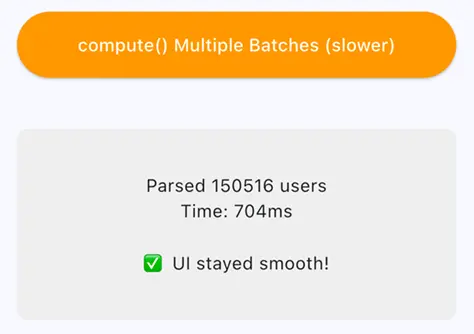
On the first glance everything looks good, but we need to remember that compute() spawns a new isolate, processes the data, and then kills the isolate. For three batches you are creating a new isolate three times. In our example, this approach took 704ms to complete.
As a better alternative, we can create isolate only once and reuse it to handle multiple requests
1 final isolateManager = _IsolateManager();
2 await isolateManager.initialize();
3
4 for (final batch in batches) {
5   final result = await isolateManager.processBatch (batch);
6 }
7 await isolateManager.dispose();
The IsolateManager will contain all the necessary information such as:
- Isolate
- SendPort
- ReceivePort
The manager will also handle initializing and disposing processes so that we could properly handle resources of the device.
1 Future<void> initialize() async {
2    _receivePort = ReceivePort();
3    _isolate = await Isolate.spawn(_isolateEntryPoint, _receivePort!.sendPort);
4 _sendPort = await _receivePort!. first as SendPort;
5 }
1 Future<void> dispose() async {
2 _isolate?.kill(priority: Isolate.immediate);
3 _receivePort?.close();
4 _isolate = null;
5 _sendPort = null;
6 }Now let’s take a look at the core logic of our example. Instead of the compute() we are going to use listen() to keep the isolate alive. This approach allows the isolate to process each message, while staying ready to handle next requests.
1 final isolateReceivePort = ReceivePort();
2 callerSendPort.send(isolateReceivePort.sendPort);
3
4 isolateReceivePort.listen((message) {
5   final data = message['data'] as List<String>;
6   final responsePort = message ['responsePort'] as SendPort;
7
8   int userCount = 0;
9
10  for (final jsonString in data) {
11    try {
12      final json = jsonDecode(jsonString) as Map<String, dynamic>;
13      final users = json['users'] as List;
14      userCount += users.length;
15   } catch (e) {
16     print('Error parsing JSON: $e');
17   }
18  }
19
20  responsePort.send(userCount);
21  });
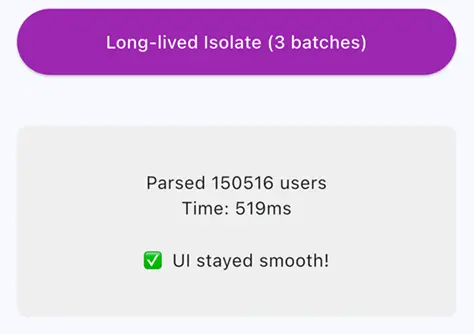
As a result, by utilizing the alternative solution with Isolate.spawn() we will be able to avoid spending time creating isolate for each request. This optimization will result in 200ms saved time. The difference between those solutions becomes more significant as the number of requests increases
Making conclusion
Isolates are an essential part of every app that performs heavy tasks. Sometimes using isolates is necessary to keep your app performing the way you want it to. If you need a lot of control or just a quick calculation, Flutter has tools to cover any need. I hope this article was helpful to you. Thanks for reading, and see you soon.


